Written by Steve Patterson. If you're
just joining us, this is the second of two Photoshop tutorials on how to
enhance your photos, especially portrait shots, using a soft glow
effect which not only softens the overall image but also helps to smooth
skin, boost contrast and enhance colors, all at the same time.
There's a couple of ways to create this effect in Photoshop, both of which can be completed very easily. Both ways can also give you great looking results. The key difference between them is that one produces a static effect, meaning that it can't easily be changed or edited later, while the other remains fully editable even after the effect has been completed, allowing you to go back, make changes, and see if you can improve the results even further.
In the first of these two tutorials, we learned how to add a soft glow using the more basic and traditional method (the static method) that's better suited for beginner Photoshop users. It gave us great results but it didn't let us go back and make further changes or improvements. In this tutorial, we'll learn how to create the exact same soft glow effect while keeping it fully editable from start to finish, and we'll do that by taking advantage of Smart Objects and Smart Filters.
Smart Objects and Smart Filters may be considered more "advanced" features in Photoshop, but don't let that fool you. As we'll see, they're every bit as easy to use as normal layers and filters, with the added benefits of being extremely flexible and completely editable without any loss in image quality. As always, I'll cover everything step-by-step, explaining things as we go so that even if you're new to Photoshop, you can easily follow along.
If you haven't done so already, I encourage you to work through the first tutorial, Easy Soft Glow Effect In Photoshop, before moving on to this one since this tutorial will occasionally mention steps that were covered previously.
Here's the photo I'll be using (hippie girl photo from Shutterstock):


Smart Objects are very flexible. In fact, many of the things we can do to a layer, we can also do to a Smart Object. The important difference, though, is that when we edit a Smart Object, that's exactly what we're doing; we're editing the Smart Object itself, not the layer. In other words, we're editing the container, not what's inside the container. The layer inside the Smart Object always remains safe and unharmed, and that's what makes Smart Objects so flexible and editable; no matter what we do to a Smart Object, Photoshop always has that original, unedited layer inside of it to go back to.
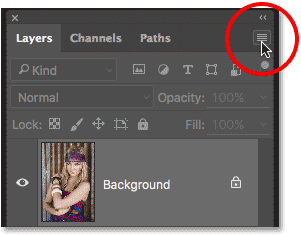
This tutorial doesn't even begin to cover all of the things we can do with Smart Objects, but let's see how they can help us with our soft glow effect. To convert the Background layer into a Smart Object, click on the small menu icon in the upper right corner of the Layers panel:
Smart Objects are very flexible. In fact, many of the things we can do to a layer, we can also do to a Smart Object. The important difference, though, is that when we edit a Smart Object, that's exactly what we're doing; we're editing the Smart Object itself, not the layer. In other words, we're editing the container, not what's inside the container. The layer inside the Smart Object always remains safe and unharmed, and that's what makes Smart Objects so flexible and editable; no matter what we do to a Smart Object, Photoshop always has that original, unedited layer inside of it to go back to.
This tutorial doesn't even begin to cover all of the things we can do with Smart Objects, but let's see how they can help us with our soft glow effect. To convert the Background layer into a Smart Object, click on the small menu icon in the upper right corner of the Layers panel:
There's a couple of ways to create this effect in Photoshop, both of which can be completed very easily. Both ways can also give you great looking results. The key difference between them is that one produces a static effect, meaning that it can't easily be changed or edited later, while the other remains fully editable even after the effect has been completed, allowing you to go back, make changes, and see if you can improve the results even further.
In the first of these two tutorials, we learned how to add a soft glow using the more basic and traditional method (the static method) that's better suited for beginner Photoshop users. It gave us great results but it didn't let us go back and make further changes or improvements. In this tutorial, we'll learn how to create the exact same soft glow effect while keeping it fully editable from start to finish, and we'll do that by taking advantage of Smart Objects and Smart Filters.
Smart Objects and Smart Filters may be considered more "advanced" features in Photoshop, but don't let that fool you. As we'll see, they're every bit as easy to use as normal layers and filters, with the added benefits of being extremely flexible and completely editable without any loss in image quality. As always, I'll cover everything step-by-step, explaining things as we go so that even if you're new to Photoshop, you can easily follow along.
If you haven't done so already, I encourage you to work through the first tutorial, Easy Soft Glow Effect In Photoshop, before moving on to this one since this tutorial will occasionally mention steps that were covered previously.
Here's the photo I'll be using (hippie girl photo from Shutterstock):
The original image.
And here's how it will look after applying the soft glow effect:
The final result.
Let's get started!Step 1: Convert The Background Layer Into A Smart Object
In the previous tutorial where we learned the more traditional way of creating the soft glow effect, the first thing we needed to do was duplicate the Background layer. Here, we see my image sitting on the Background layer in the Layers panel, just like before:
The Layers panel showing the photo on the Background layer.
This time, because we'll be keeping the effect fully editable, what
we need to do instead is convert the Background layer into a Smart Object.
What's a Smart Object? Think of Smart Objects in Photoshop as
containers that hold layers, and converting a layer into a Smart Object
is like placing the layer inside one of these containers. The containers
are transparent so we can't actually see them, which is what makes
Smart Objects a bit confusing at first. What we see in our document is
not the Smart Object but the layer inside the Smart Object.Smart Objects are very flexible. In fact, many of the things we can do to a layer, we can also do to a Smart Object. The important difference, though, is that when we edit a Smart Object, that's exactly what we're doing; we're editing the Smart Object itself, not the layer. In other words, we're editing the container, not what's inside the container. The layer inside the Smart Object always remains safe and unharmed, and that's what makes Smart Objects so flexible and editable; no matter what we do to a Smart Object, Photoshop always has that original, unedited layer inside of it to go back to.
This tutorial doesn't even begin to cover all of the things we can do with Smart Objects, but let's see how they can help us with our soft glow effect. To convert the Background layer into a Smart Object, click on the small menu icon in the upper right corner of the Layers panel:
 |
Paint.net is (at least in our opinion) the simplest option on the list. It still comes with a ton of powerful features like layers, adjustments, and user-created plugins, but is simple enough that complete newcomers can grasp it immediately. The features are across the top, and filters are accessible from a drop-down menu.
ReplyDeleteSome of the special effects are pretty cool: sharpen, blur, distort, emboss, etc. You can even get some Instagram-esque vintage effects in there for good measure. We don’t want to waste too much time on this one. It’s got a lot of features, an easy interface, and a simple layout. If you’re struggling with others on this list, then stick with the easiest option.